The following series of pages will guide you through uploading and geocoding a database of
postal addresses in batch.
-
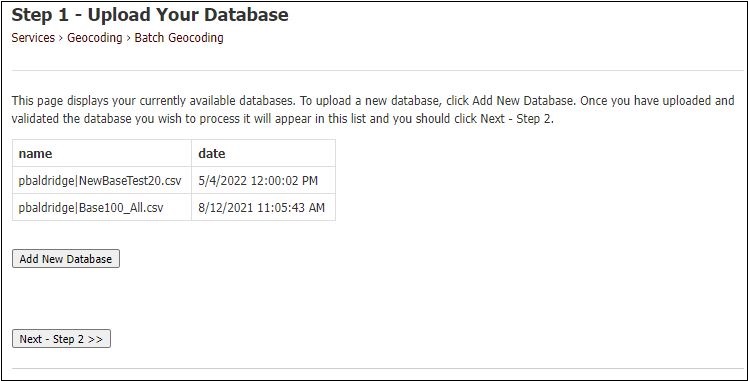
Step 1) Upload your database
-
To begin using the free online batch database geocoder, you must first upload a database of
address data.
This is done by
clicking on the Start-Step 1>> button. If you have not yet uploaded your database, clicking "Add New Database"
will bring you to the portion of the site where you can upload, validate, share, and download your personal database.
Details on uploading and validating your databases are available here.
Sample input data files are available here.
This step is shown in the following image:
Supported database formats
| Database type |
File extension |
|
Microsoft Access 20003 and Microsoft Access 97*
|
*.mdb
|
|
Microsoft Access 2007
|
*.accdb
|
|
Comma separated values
|
*.csv
|
|
Text delimited
|
*.txt
|
* Access 97 does not support the decimal datatype, so you will run into problems
if/when you click on the auto generate button to create output fields in your database.
Access 97 users will need to create the output fields before uploading databases
for use in the batch processing.
Database fields
The database you upload should include the following fields
that contain information about the address data you want
to create geocodes for:
Required input fields
| Field name* |
Field type |
Field description |
| UniqueID |
Number |
The unique identifier for the record |
| StreetAddress |
Text |
The street address of the records |
| City |
Text |
The city of the records |
| State |
Text |
The state of the records |
| ZIP |
Text |
The ZIP code of the records |
* These fields can have any name, you will identify them in the third step
In addition to the input fields, your database can also contain existing fields
for the geocodes that will be produced after you work with the service. These
fields are optional because they can be created for you automatically in the third
step.
Optional output fields
| Field name* |
Field type |
Field description |
| Longitude |
Double |
The longitude of the output geocode |
| Latitude |
Double |
The latitude of the output geocode |
| Quality |
Text |
The quality of the output geocode |
| Source |
Text |
The name of the geocoder |
| Updated |
Number |
Indicates non/processed records |
| Coordinates |
Memo |
The coordinates of the reference polygon |
| Debug |
Memo |
Debugging info from the geocoding process |
* These fields can have any name, you will identify them in the third step
-
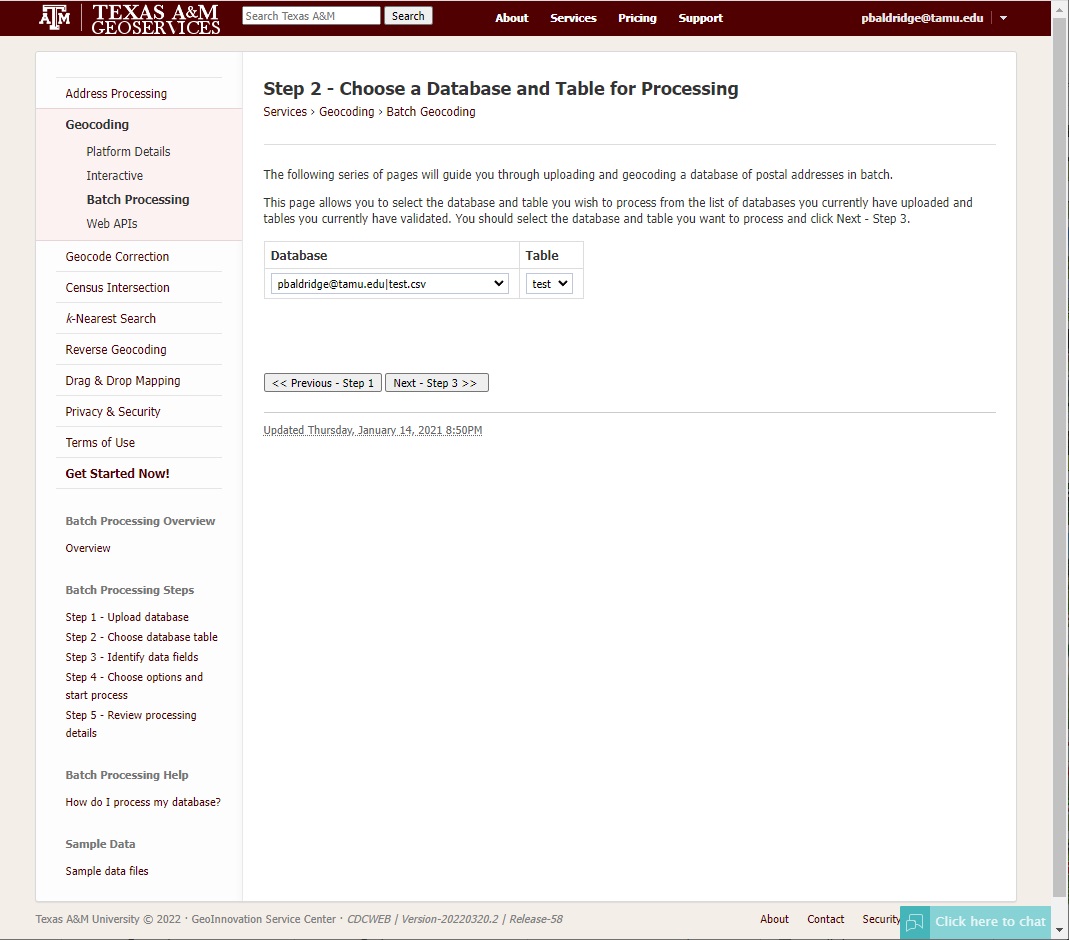
Step 2) Choose your database and table
-
After you have uploaded your database you must select the table you want to work on. This is
shown in the following image:
-
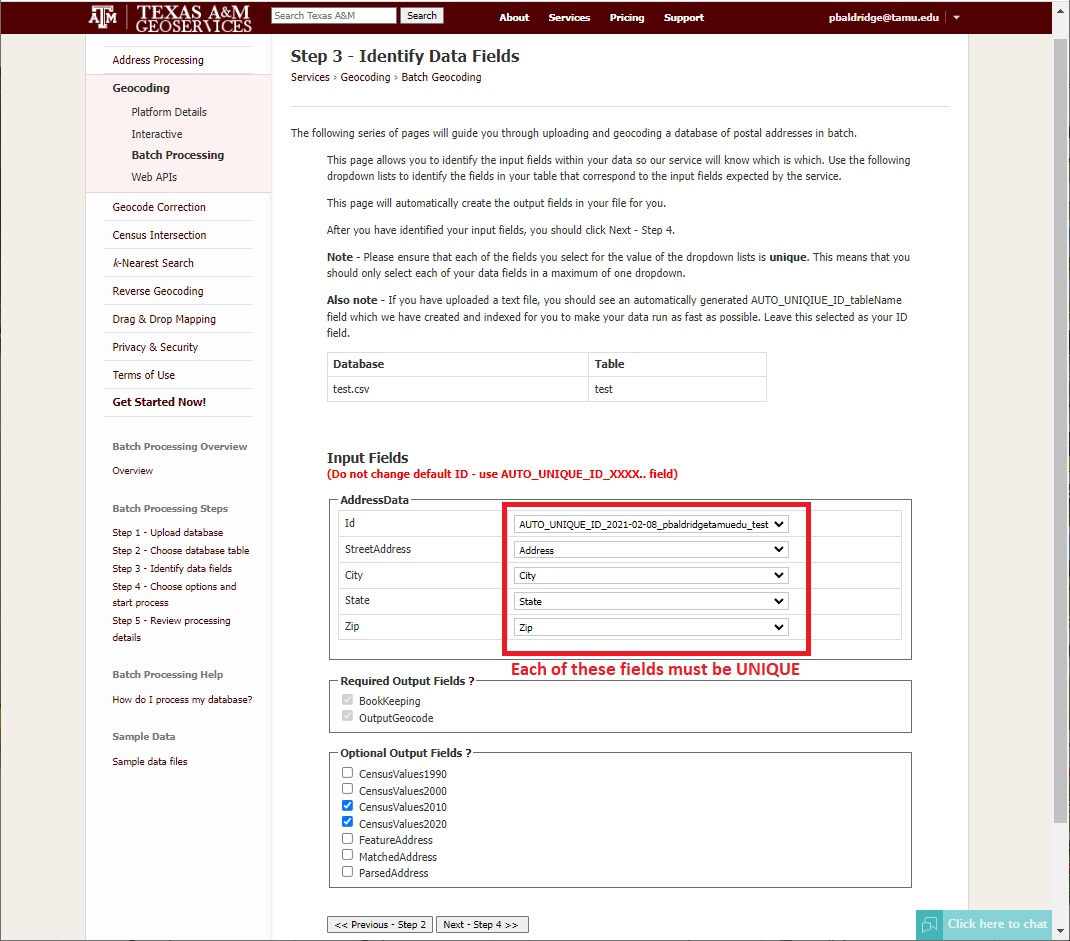
Step 3) Identify your database fields
-
After you have uploaded your database and selected the table you want to work on
you have to identify the required input fields in your database. Each of the fields
you select from these drop down lists must be unique, meaning that you should
only select a column in your database in just one drop down. If you select the
same database column in more than one drop down, you will get an error when
you try to run your database that says Duplicate output destination 'columnName'.
If you select any of the optional output fields, it may take longer to process your data. If you are curious about any of these fields, please feel free to contact us. This step is shown in the following image:
* Access 97 does not support the decimal datatype, so you will run into problems
if/when you click on the auto generate button to create output fields in your database.
Access 97 users will need to create the output fields before uploading databases
for use in the batch processing.
-
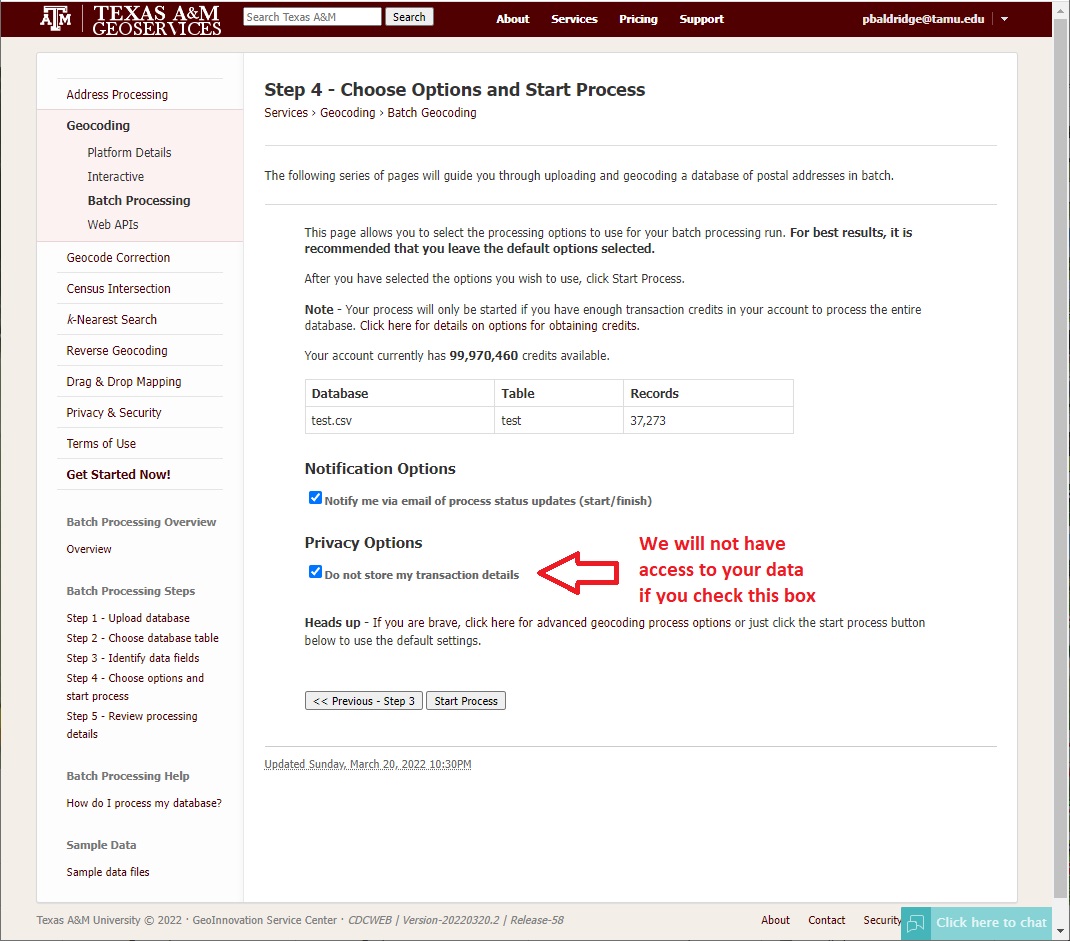
Step 4) Choose your processing options
-
After you have uploaded your database, selected the table you want to work, and identified and/or created the fields, you finally select the geocoding options you want to use and start the geocoding process on your database. For the best results, it is recommended to leave the default options checked. If you do not want us to have access to your data, check the box that says
Do not store my transaction details. However, this may limit our ability to assist you if you have problems processing your data.
-
If you have questions about the advanced geocoding options, feel free to contact us. This step is shown in the following image:
Each of these options are described on
the technical details page. Click on the following
links to go directly to each topic:
-
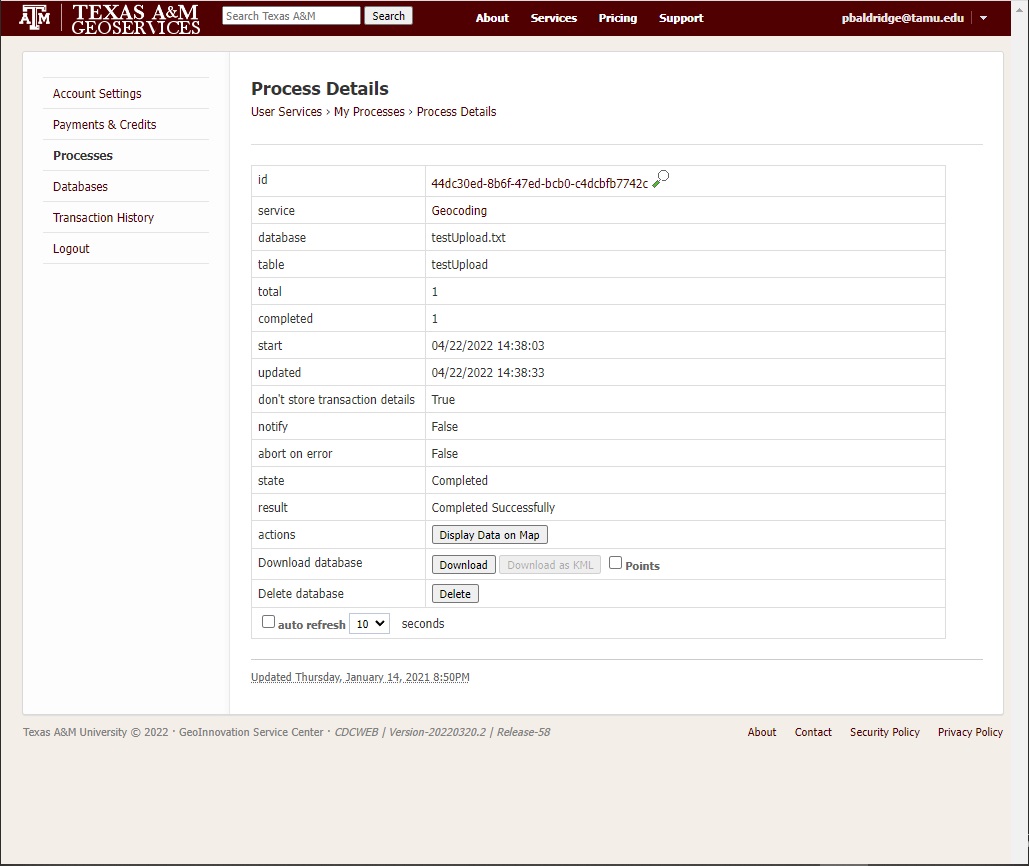
Step 5) Review your geocoding processes
-
After you select your geocoding options and click geocode, your process is started
and added to the list on next tab as in the figure.
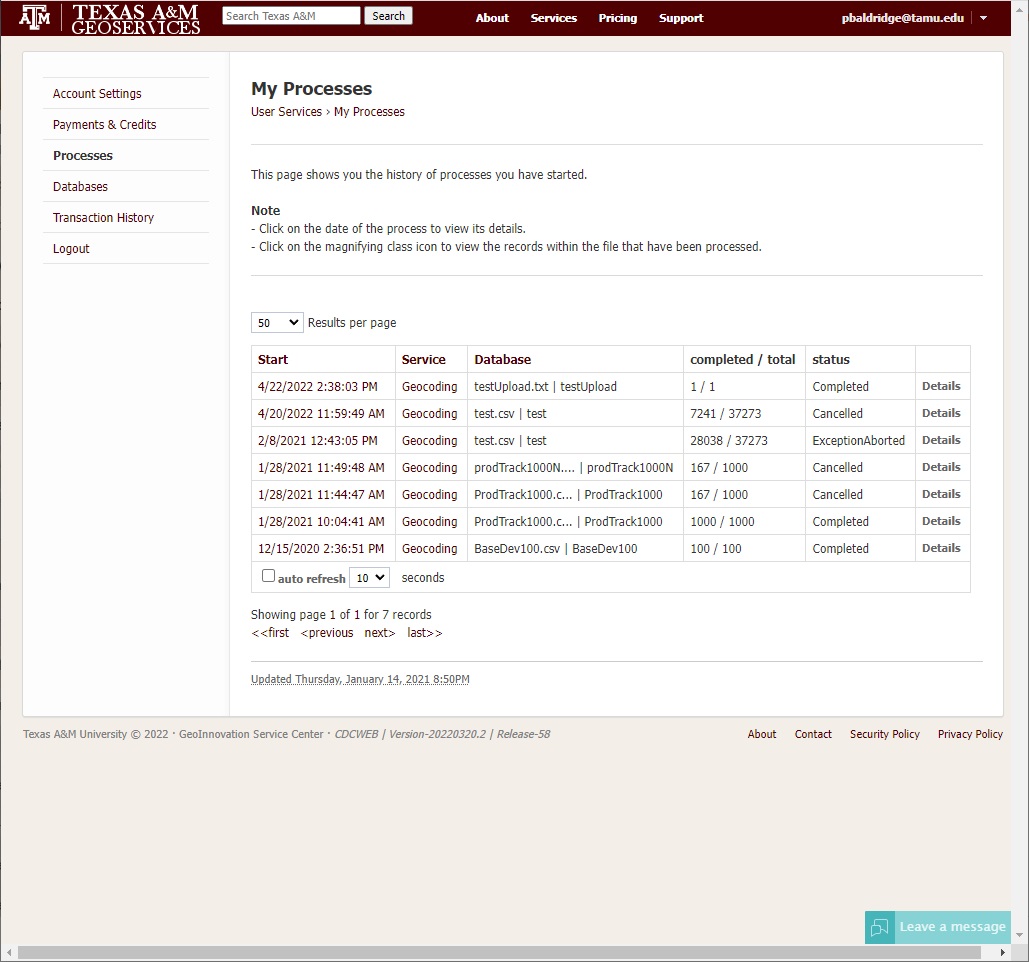
Processes in this list will be in one of four states. Processes which are
running can be cancelled, paused and resumed.
Process States
| State |
Description |
| Running |
The process is running and geocoding your database |
| Completed |
The process has finished geocoding your database |
| Cancelled |
The process has been cancelled by the user |
| Aborted |
The process has aborted because an error occurred |
-
Step 6) Download your processed database
-
Once your geocoding process has been run, you can click on the
database name in the processes table to view the results. This
brings you to the page shown in the next image from which
you can click the download button to save your processed
database back to your hard drive.